Saturday, October 1, 2016

Monkey Bread

We love this monkey bread and have it every Christmas morning. We're also having it for General Conference morning. We're starting a new tradition where we go to the store and we all pick something to enjoy during Conference together. My choice was to get frozen bread loaves and make this. We'll pull out the other choices (fresh squeezed OJ, fruit snacks, & ready-made cookie dough) for the next sessions. Gotta go eat my monkey bread.

Ingredients:
2. 1 lb loaves frozen white bread dough
1 1/4 cups sugar, divided
1/4 cup brown sugar
1/4 cup milk
1 TBSP margarine or butter
1 3/4 tsp ground cinnamon, divided
Bundt Pan (12 cup size)

Directions:
1. Thaw bread dough in fridge for 12 hours.
2. Combine 1 cup sugar, brown sugar, milk, butter, and 1 1/4 tsp cinnamon in a small sauce pan. Bring to a boil; cook 1 minute. Remove sugar syrup from heat; let cool 10 minutes.
3. Combine 1/4 cup sugar and 1/2 tsp cinnamon in a shallow bowl; stir well. Cut each loaf of dough into 24 equal portions. Roll each portion in sugar mixture; layer balls of dough in a 12 cup Bundt pan.
4. Pour Half of sugar syrup over dough; cover and rise in warm place for 30-35 minutes. Bake at 350 for about us 25 minutes or until lightly browned. Immediately loosen around edges and invert onto serving plate. Remove pan and drizzle remaining syrup on top. Serve while warm and enjoy!

Tuesday, August 9, 2016

Chicken Pesto Gnocchi


Gnocchi with Chicken, Pesto, and Fresh Mozzarella
 The pictures really don't look that great, but believe me, this is delicious.  And, oh, so, simple!
The prepared pesto, gnocchi, and fresh mozzarella can be purchased at Costco and you'll have enough to make this twice (four times for the fresh mozzarella.)  I even got the chicken at Costco- but you can get all of those things at a regular grocery store as well. 

Chicken Pesto Gnocchi
About 1 Tablespoon oil
1  boneless, skinless chicken breast, cut up or 1 package chicken tenders, cut up
About 1/4 cup chicken broth
8 oz. (or so) pesto
1 pkg. potato gnocchi (about 12 ounces)
1/2 roll (about 4 ounces) fresh mozzarella


Salt and pepper the chicken.  Heat the oil in a skillet and cook the chicken until done.  Add the chicken broth and cook for a few minutes. Turn off the heat and add the pesto sauce.
In a large saucepan, heat water to boiling.  Add the gnocchi and cook until they float to the top.  It doesn't take very long- about three minutes.  While the gnocchi are cooking, cut up the fresh mozzarella into chunks. 
When the gnocchi are done, pour the water through a strainer, or, using a slotted spoon take out the gnocchi and put them in the skillet.  After adding all of the gnocchi, stir together, then add the Mozzarella chunks.  Stir in, then let sit for a couple of minutes to let the cheese melt. 


Wednesday, July 27, 2016

Cool as a Cucumber Sandwiches

When it's hot outside, these cool cucumber sandwiches hit the spot!

Cucumber Lemon Cream Cheese Sandwiches
Bread for 4 sandwiches
8 oz. Cream Cheese
Lemon rind, about 1 teaspoons
Pinch of sugar
Salt and Pepper
Fresh lemon juice, about 2 Tablespoons
Chives, fresh or dried (or you could use a little bit of green onion)
Cucumber, sliced thin
Ham (optional)
Soft butter

Mix together the softened cream cheese, lemon juice, lemon rind, sugar, salt, pepper, and onion or chives.
Spread butter on bread, then the cream cheese mixture.  Top with cucumber and ham.  For fancy sandwiches, trim off the crusts and cut into squares. 


Sunday, July 10, 2016

Raspberry Cream Pie

We planted raspberry starts 2 or 3 years ago and this year we are getting our first really good crop. So, I looked online to find a yummy raspberry dessert. This pie is what I decided to try. It was definitely delicious, though I would have liked it better in a graham cracker or Oreo crust.

What do you like to do with fresh raspberries?


Friday, July 1, 2016

Homemade Hamburger or Hot Dog Buns


Want to make your own buns for your 4th of July barbecue?  These are easy and delicious.  And you can make them any size you want.  I made them little for tiny hot dogs.  You could do the same for hamburger sliders.  This recipe makes 8 regular- sized hamburger buns.  It made about 60 baby hot dog buns.  The rule of thumb is to form the dough into about the size of the hot dog or hamburger you are putting on it.  It will rise and be just the right size.

Homemade Hamburger or Hot Dog Buns

1/4 cup warm tap water
1 Tablespoon yeast

3/4 cup milk
2 Tablespoons butter
1/4 cup sugar
1 1/4 teaspoons salt

1 large egg plus another egg separated
3 1/2 cups (or so) flour

Mix the water and yeast together in a cup and let work while you prepare the milk mixture.  In a microwave-proof measuring cup, mix the milk, butter, sugar and salt.  Microwave until warm and the butter is mostly melted.  Put the flour in a large bowl and add the milk mixture.  Put in 1 egg.  Separate another egg, saving the egg white in cup for later.  Put the yolk in the mixture.  Add the yeast mixture and mix well.  Knead for a few minutes until you have a smooth, elastic, soft dough.  Cover and let rise until double in bulk.  Punch down and knead for a minute.  Form the buns into desired size and place on a sprayed baking sheet (or use a silicone baking sheet or oven paper)  Brush the buns with the egg white mixed with a little bit of water.  Sprinkle with sesame seeds.  If you prefer, you can brush them with melted butter. 
Let rise until puffy and about double.  Bake at 375 until golden brown.  The big hamburger buns will take about 15 minutes, the baby ones, only about 7 or 8 minutes. 
These little hot dogs were the hit of the party. 

Wednesday, June 29, 2016

4th of July Popcorn

Want a fun treat for the Fourth of July?  This is so easy and delicious. It is sweet, salty, and buttery and crunchy.   And you probably have all the ingredients!

4th of July Popcorn
3 bags microwave popcorn, buttered variety
1 cup sugar x3
2 Tablespoons butter x3
1/4 cup water x3
Red and blue food coloring

First pop the corn according to the package directions.  Lay out waxed paper on your countertop or in large cookie sheets.  In a large kettle, combine 1 cup of sugar, 2 Tablespoons of butter and 1/4 cup of water.  Bring to a boil and boil for about 3  1/2 -4 minutes (If it starts to brown, take off heat immediately.)    Take off of the stove.  Mix in 1 bag of the popped corn.  Stir and stir until all the popcorn is coated.  Lay the candied corn out on the waxed paper.  Cool completely while you wash the pan.  Put the candied corn in a very large bowl, leaving the waxed paper for the next batch.  Then do the 2nd batch.  This time add a few drops of red food coloring after you take the cooked mixture off the stove.  Be sure to add enough that it makes red and not pink.  Then repeat with the third batch, this time adding blue food coloring.  Be sure to add enough color so the colors are vibrant!    Mix the three colors together in the large bowl, then store in an airtight container. 


Tuesday, June 28, 2016

4th of July Taco Salad


I saw this cute idea on Pinterest.  It's just a taco salad with layered ingredients instead of mixed together.

4th of July Taco Salad
1 lb. ground beef
1 onion, diced
1 can tomato paste (or 1 can tomato sauce)
1 can water (don't add the water if you use the sauce)
1 package taco seasoning mix
Shredded lettuce
Grated Cheese
Sliced olives
Cherry tomatoes, sliced in half
Tortilla chips
Guacamole and/ or ranch dressing
Salsa
Tabasco Sauce

Brown the ground beef and onion together.  When browned, add the tomato paste, water, and taco seasoning.  Add about 1 teaspoon of sugar.  Simmer for a few minutes while you prepare the rest of the ingredients, stirring occasionally. 

In a tray or 13x9 pan or casserole dish, layer the ingredients.  First, the hamburger mixture, then completely cover that with the shredded lettuce.  Leaving a square in the corner for the stars, make stripes, alternating the tomatoes and cheese.  Put sliced olives in the square, representing the stars.  Put tortilla chips all around the edges.  You can make a layer of tortilla chips below the hamburger mixture if you would like, as well.  Serve with guacamole (mashed avocado mixed with salt and pepper and lemon juice), salsa and tabasco sauce.

Sunday, June 12, 2016

Yogurt Smoothie

I've been eating a lot due to being pregnant and this is one of my favorite healthy snacks.

Ingredients:
2 large scoops of plain yogurt
2 large scoops of flavored yogurt (raspberry is my favorite)
1/2 cup of milk or grape juice
1/4 cup frozen blueberries 
1/4 cup frozen strawberries 

Put all ingredients in a blender and blend until smooth and a little frothy. Serve immediately and enjoy!
Yields: 1 serving

Tuesday, June 7, 2016

Baked Creamy Chicken Taquitos

I recently tried this new recipe that I loved and wanted to share.  I made it for the Mackrorys while I was there, and it was a hit!  Kids love them, and they make great freezer meals.   I got it from Sara at Our Best Bites.  I will link directly to her post, since it is very thorough and helpful.

http://ourbestbites.com/2014/07/baked-creamy-chicken-taquitos/
Our Best Bites Baked Creamy Chicken Taquitos intro
This picture came from ourbestbites.com

It is yummy served with Creamy Lime Cilantro dressing for dipping.
http://ourbestbites.com/2009/03/creamy-lime-cilantro-dressing/


Coconut Curry Chicken Soup

Thai cuisine - Looks lengthy, but goes together very quickly. A very hardy soup with fabulous flavor. This recipe was put together by a personal chef who cooks for professional athletes. It is on the regular rotation at our house. I got it from my friend Eve about six years ago, and have been making it regularly since.  Every time we have made it for guests, they have asked for the recipe. It was originally from "Eating Well" magazine, but I have made some changes to simplify, decrease cooking time, and decrease the amount of pans I have to wash afterwards. Definitely a pleaser!


Ingredients


  • 1 T canola or olive oil
  • ¼ C thinly sliced onion, chopped
  • 2 tsp red curry paste (essential – find it in big grocery stores or health food store)
  • 1 ½ tsp curry powder
  • ½ tsp ground turmeric
  • ½ tsp ground coriander
  • 2 garlic cloves, minced
  • 6 C chicken broth (can use low fat, low sodium) I use boullion cubes or better than boullion
  • 1 (13.5 oz) can light coconut milk (I used regular)
  • 2 ½ C shredded cooked chicken breast or turkey (about 1 lb) I usually pre-cook and chop chicken breasts, sprinkling them with salt and pepper after baking. Could use shredded rotisserie chicken or whatever chicken you have on hand.
  • ½ C chopped green onions
  • 2 T sugar
  • ½ C fresh chopped cilantro
  • ¼ tsp crushed red pepper OR 4 small hot red chiles, seeded and chopped (I used 1/8 t ground)
  • 3 C fresh spinach leaves
  • ½ lb snow peas, trimmed and cut in half crosswise (I often omit this b/c I don't have it on hand, could use peas)
  • 1 (5 ¾ oz) package pad thai noodles, aka: wide rice noodles (4 packages ramen worked okay in a pinch, but definitely not optimal)
  • 7 lime wedges 


Directions:

1.  Heat oil in large pot over medium-high heat. Add onions and the next 5 ingredients (through garlic) to pan; sauté 1 minute, stirring constantly.
2.  Add chicken broth to pot and bring to a boil. Add coconut milk to pan; reduce heat and simmer for five minutes. Add remaining ingredients, except for lime wedges.  Simmer for about three minutes to soften the noodles.
3.  Serve with lime wedges. I like to serve some kind of bread on the side, such as muffins, naan, or peasant bread.

Yield: 7 servings (serving size: 2 cups soup and 1 lime wedge)


A note about some of the more unusual ingredients:  

  • The red curry paste is available in the Asian food section of most grocery stores. I have found it at Walmart, Albertsons, and Safeway.
  • The pad thai noodles are wide rice noodles. The package that I usually buy looks like this, but any brand is okay.


Monday, June 6, 2016

Whole Wheat Berry Banana Muffins

  • Yields: 12 muffins

  • Ingredients:
  • 2 cups (240g) whole wheat flour (I used 1 cup of wheat flour I ground myself and 1 cup of white flour.)
  • 1 tsp baking powder
  • ½ tsp baking soda
  • ¼ tsp salt
  • 1 tbsp (14g) butter or margarine, melted and cooled slightly
  • 2 large egg whites, room temperature
  • 1 ½ tsp vanilla extract
  • ¾ cup (200g) mashed banana (about 2 medium)
  • ¼ cup (60g) plain or honey Greek yogurt
  • 3 tbsp (45mL) honey
  • ¼ cup (60mL) milk
  • ½ cup (80g) diced fresh strawberries (about 4 medium-large) I used slightly thawed frozen, sliced berries.
  • ½ cup (70g) fresh blueberries (I used frozen berries straight from the freezer.)

Instructions:
  1. Preheat the oven to 350°F, and get out your muffin tins, spray them with nonstick spray if you use it.
  2. In a small bowl, whisk together the flour, baking powder, baking soda, and salt. In a separate (larger) bowl, whisk together the butter, egg whites, and vanilla. Stir in the mashed banana, Greek yogurt, and honey, mixing until no large lumps of yogurt remain. Alternate between adding the flour mixture and the milk, stirring just until incorporated, beginning and ending with the flour mixture. (For best results, add the flour mixture in 3 equal parts.) Gently fold in the strawberries and blueberries.
  3. Scoop the batter into the prepared muffin tins. Bake at 350°F for 20-25 minutes, or until a toothpick inserted into the center comes out clean. If you're using frozen berries bake closer to the 25 minutes. I started with 20 minutes and checked them every couple of minutes. Cool in the pan for 10 minutes before transferring to a wire rack.

I got the original recipe from amyshealthybaking.com. I've made a few minor changes but love how they turned out!

Thursday, June 2, 2016

Simple Chocolate Ice Cream


This recipe came with our Cuisinart ice cream maker and we decided to try it out. It was rich and oh, so delicious!

1 cup unsweetened cocoa powder (I just used 1/2 cup cuz I am cheap and I used chocolate milk instead of regular milk.)
2/3 cup sugar
1/2 cup firmly packed brown sugar
1 1/2 cup whole milk
3 1/4 cup heavy cream
1 T vanilla extract

Place the cocoa and sugars in a medium bowl; stir to combine. Add the whole milk and use a hand mixer on low speed or whisk to combine until the cocoa and sugars are dissolved, about 1 to 2 minutes. Stir in the heavy cream and vanilla. If not freezing immediately cover and refrigerate until ready to use.

Turn on machine; pour mixture into freezer bowl and let mix until thickened, about 25-35 minutes. The ice cream will have a soft, creamy texture. If a firmer consistency is desired, transfer the ice cream to an airtight container and place in freezer for about 2 hours. Remove from freezer about 15 minutes before serving.

Wednesday, June 1, 2016

Yaki Noodles

This picture is a little blurry because of the steam rising from the hot food.

One of the favorite questions for Japanese people to ask is "What is your favorite food?"  Often the answer is yaki soba or yaki udon.  Yaki means "fried" and soba and udon are noodles.  Soba is thin, kind of like spaghetti and udon are thick noodles.  So, I went on an Internet search and found recipes to try this favorite.  Though I'm not sure you can get soba or udon in America, I really think any noodle will do.  The other ingredients are easily attainable in America.  I hope you enjoy it!

Yaki Noodles
2 packages frozen udon noodles (or equivalent in other noodles, cooked.  Each package of frozen noodles is about a cup of cooked noodles)
1/2 large onion
2-3 large cabbage leaves
1 carrot
1 package shitake mushrooms (or white button mushrooms)
2 green onions or scallions
1/2 lb. sliced pork belly, or your choice of meat  (sliced pork belly is just very thin slices of stir-fry pork)
Oil
Black pepper
About 1/4 cup soy sauce
About 2 Tablespoons sugar

Cook the noodles until el dente.  Drain and rinse.  Set aside.
Slice the onion and cut the cabbage into 1 " squares.  Julienne the carrots.  Cut them into 1" sections, then cut those sections into "matchsticks"  Slice the mush rooms.  Thinly slice the green tops of the green onions and set aside for garnish.  Slice the rest of the green onion into 2 " pieces.  Cut the stir-fry meat into 1 " pieces.
In a large skillet, heat the oil over medium heat.  Add the pork and cook until almost cooked through.  Add the onion and cook until translucent and soft.  Add the cabbage and carrot and stir fry until coated with oil and starting to wilt.  Add the mushroom and green onion and cook until wilted.  Add the noodles, and mix with the other ingredients well.  Mix together the soy sauce, sugar, and a little water.  Add it in and stir and fry together.  Season with plenty of black pepper.
Serve, garnished with green onion. 

Monday, May 9, 2016

Chicken Fajitas


I love these chicken fajitas.  They are easy and fast and tasty.  AND  I can get all the ingredients in Japan.  I got the original recipe from my sister, Joan, but I may have altered it some through the years, but the marinade is the same.  It really makes for tasty chicken.

Chicken Fajitas
*2-4 boneless, skinless chicken breasts, cut up in thin strips or chunks
4 T. white vinegar
4 T. soy sauce
1 teaspoon crushed garlic or garlic powder
1 teaspoon pepper
Lemon Juice

Cut up the chicken.  Mix together the vinegar, soy sauce, garlic, pepper, and lemon juice.  Put the chicken in the marinade while you prepare the other ingredients.

2 bell peppers, cut into thin strips
1 large onion, cut into strips
Oil or butter for frying

Toppings: 
Tomatoes, cut up
Lettuce, sliced thin
Avocados or guacamole
Sour Cream
Tabasco sauce
Salsa

Soft flour tortillas

Put the oil in a large skillet.  Add the onions and bell peppers.  On medium heat, saute them until the vegetables are soft and golden.  It takes awhile.  Add the marinated chicken with just a little of the marinade.  Cook all together until the chicken is done and a bit caramelized and sizzling. 

On a tortilla, put some of the chicken mixture and then add whatever toppings you desire.

*They are also delicious made with beef or shrimp or a mixture of protein.  My favorite- chicken and shrimp together. 

Friday, May 6, 2016

Breakfast Burritos

One of our favorite things to have for breakfast here in Japan is Breakfast Burritos.  We were so excited when we found flour tortillas at Costco!  These are delicious for dinner an easy dinner, too. 
Breakfast Burritos
3 extra large eggs
Cheese, grated
Flour tortillas
Vegetables and Meats of choice- use any or all of the following to your taste.
1 onion, chopped
mushrooms, chopped
Green pepper, chopped
Ham, chopped
Green onion, chopped
Tomatoes, chopped
Garlic
Whatever other vegetables and meats that you want. 

In a bowl, scramble the eggs together and add salt and pepper.  Heat some oil in a large skillet.  Add the vegetables and fry until tender.  Add the eggs and plenty of grated cheese.  Cook until eggs are done.  Put the egg mixture in the middle of a flour tortilla.  Sprinkle with Tabasco sauce.  Roll up.  Serve with salsa, guacamole, and Tabasco sauce.  Yum! 


Wednesday, April 20, 2016

Chicken Noodle Soup


Chicken Noodle Soup

This soup is easy and delicious and sure hits the spot on a cold winter day:

2 chicken breasts (best if they are on the bone, but boneless works, too)

2 quarts (or so) water

8 bouillon cubes (I prefer Better Than Bouillon, but it’s not available in Japan)

2 cups chopped celery with leaves

2 cups chopped carrots

1 onion, diced (In Japan, large green onions are used a lot and that's what I used for this soup)

1 small package frozen spinach, optional

Noodles

Salt, pepper, garlic granules (for seasoning- to taste)

In Japan, noodles are very much a part of the diet.  They sell these wonderful udon noodles frozen.  I got five of these blocks for less than a dollar.  They are just delicious. 


I put two of these blocks of noodles in the soup.  At home, I use about 3 oz. of noodles.  I pre-cook them, then add them.


Put the chicken  (you can put it in frozen) in a large pot with the water and bouillon.  Boil until chicken is tender.  Remove the chicken and add the vegetables.  When cool enough, chop up the chicken and put it back into the soup.  Let simmer for at least an hour.  Add the noodles.  Serve with crackers and cheese. 

Friday, April 15, 2016

Brownie Chip Cookies

This recipe is so easy and the cookies turn out soft and gooey and yummy.  It's one I can make in Japan because of Costco and brownie mixes!  I just made a big batch (double)  to take to the English class we teach. 

Brownie Chip Cookies
1 package brownie mix
2 eggs
1/4 cup oil
1 cup chocolate chips (it can be a mixture of white chocolate and semi-sweet)
Heat oven to 350 (180 C)
Mix the eggs and oil in a bowl.  Add the brownie mix and stir.  The dough is kind of hard to stir because it is stiff.  Spoon onto a well-greased or lined cookie sheet.  Bake 8-10 minutes.  Cookies should be soft and crackled.  Cool slightly before removing from the pan.

Wednesday, April 6, 2016

Okonomiyaki


When my husband served his first mission to Japan, he learned to love a dish called Okonomiyaki.  It's name literally means "what you want fried."  It is a savory Japanese pancake with whatever you want put in it.  It is a dish made all over Japan, but each region makes it differently.  This is a good, basic recipe to start with.  It is one of my favorite Japanese foods I've made here. 

Okonomiyaki
1 cup flour
2/3 cup water or chicken stock
2 eggs
4 cups finely chopped cabbage
1 bunch green onions, finely sliced (some people put much more than this in it)
1 cup or so of Meat of choice: chopped shrimp (my favorite), chopped chicken, thin-sliced beef or pork.  Japanese like to use pork belly (looks like bacon, but not cured), squid, and shrimp.
1/2 cup cooked noodles (optional)  The Japanese use either udon (very thick, round noodles) or soba(thinner noodles that look much like spaghetti)  Not everyone puts noodles in, but those are the crazy ones!
Toppings:
Okonomiyaki sauce (kind of like Worcestershire sauce, but sweeter and thicker.  I think you could sweeten Worcestershire sauce and it would work.
Kupi (Japanese mayonnaise)  It is sweeter than mayonnaise, but mayonnaise would work, I think
Bonito Flakes ( dried tuna flakes) optional They smell fishy, but really just add saltiness.

In a bowl, mix together the flour, water and eggs.  Add the cabbage, onions, meat and noodles.  Mix all  together.  On a hot lightly oiled griddle, spread some of the mixture in the shape and size of a large pancake.   Flatten the pancake with a spatula as it cooks.  When browned, turn it over and cook the other side.  Serve hot with the sauces.  This recipe makes two large okonomiyaki or three medium. 

To read about our mission experiences and our Okonomiyaki miracle, go here:  http://kenandkayhinton.blogspot.jp/2016/01/mission-miracle-okonomiyaki.html


Friday, March 18, 2016

Chicken Ole'

This is a delicious casserole that I've made for years at home, but find I can make it with just a few substitutions here in Japan as well.  In recent years, taco seasoning is sold in Japan, so I substituted that for the chili powder.  I substituted tomato paste with water for tomato sauce.  I can't find canned black beans here, but I did find some canned kidney beans.   I couldn't find canned green chilis, but I just added some salsa (from Costco) and that worked great!  It's fast and easy!

Chicken Ole'
2 chicken breasts, cut up in chunks
1 1/2 teaspoons chili powder
1 teaspoon garlic powder or garlic granules
1 teaspoon salt

1 large can tomato sauce
1 can green chilis (4 oz)
1 can black beans
1 can corn

Corn Chips or Tortilla Chips
1 cup or so of grated Monterey Jack Cheese
1 can black olives

Mix together the chili powder, garlic powder, and salt.  Sprinkle the mixture over the chicken and, using your hands, mix them together well.  Let sit for a couple of minutes, then fry the chicken in a large, sided skillet in olive oil.  When the chicken is done, add the tomato sauce, green chilis, corn, and black bean.  Heat and let simmer for about 10 minutes.  Serve over crushed corn or tortilla chips.  Top with cheese and olives.  Dinner is ready in about 20 minutes!!

Tuesday, March 1, 2016

Omurice


Every Tuesday evening here, members of the branch at church gather for family home evening.  It’s kind of Japanese “Chopped” as two and sometimes a third always do the cooking.  Another lady in the branch donates vegetables, then these two ladies figure out what to make with them.  One goes shopping while the other starts chopping and cooking.  They come up with delicious meals.  One evening, this omurice was the delicious result.  It is easy, quick, and you have everything you need for it right now- probably.   Living here, we nearly always have leftover rice, but you may not.  But other than that, you’ve probably got everything.

This will make dinner for 4.  It’s easy to expand or reduce, depending on how many you need to feed.  It’s basically one cup of rice and one piece of meat person. 

Omurice

4 cups of cooked rice

1 onion, chopped

1 piece of meat per person, ie: chicken thigh cut up, 1 hot dog cut up, 1/3 lb. ground beef, bacon slices cut up, etc.  You can use as little or as much meat as you wish.  The one they served us just had a little bit of hot dog in it.

Oil (I use olive oil)

Salt and pepper

½ cup ketchup

½ cup frozen green peas

4 eggs


Heat some oil in a large fry pan. Add the meat and cook until done.  Add the onion and fry on medium heat until golden and translucent.

Add the cooked rice and stir and fry together for about 2-3 minutes.  Season with salt and pepper.  Push the rice to the sides of the pan and pour the ketchup in the middle.  Spread the ketchup and cook just the ketchup alone for about 30 seconds, then stir the rice and ketchup together and cook another 2-3 minutes.  Add the peas and cook for 2 more minutes.  Divide the rice mixture into 1/4ths.  Put each ¼ into a bowl or other mold.  Traditionally, omurice is a sort of oval shape.  Turn bowl upside down on a plate.
  Repeat for all four bowls of rice.  Beat 1 egg with some salt and pour it into a small fry pan and move it around like you were making a crepe.  You want a crepe-like thin round sheet of egg.  Cook on one side til done, then gently turn it over.  When done, put the cooked egg over the rice like a blanket.  Tuck in the sides.  Repeat for the other three.  Serve immediately. 

Monday, February 8, 2016

No Bake Cookies Candy


No-Bake Cookies

We do a lot of visiting to homes as we serve here in Japan.  I like to take a little treat when we go.  I love making these into little balls so they look more like little pieces of chocolate candy and keep them in a plastic container in the fridge.  Then we’re headed out on visits, I can put several in a pretty little bag and it makes a nice, little gift.

No-Bake Cookies

Lay out parchment paper or waxed paper on a countertop or table.

In a mixing bowl, put:

3 cups oatmeal

¼ cup cocoa

½ cup peanut butter

1 teaspoon vanilla

Set aside.

Combine in a saucepan:

2 cups sugar

1/3 cup butter

½ cup milk

Heat until boiling.  Boil for 1 minute.  If it’s a humid day, boil a bit longer.

Pour the boiling liquid over the oatmeal mixture, melting the peanut butter.  Stir well. 

As soon as it’s cool enough, roll little balls in your hands and put them on the parchment to set up. 

Thursday, February 4, 2016

Lemon Bread


This bread was a hit as refreshments at a recent English Class. 

Lemon Bread

½ cup shortening or ½ cup butter (because I can’t find shortening here)

1 cup sugar

2 eggs

½ cup milk (You can use part fresh lemon juice if you want.  It makes it more lemony)

1 ½ cup flour

1 teaspoon salt (maybe a scant teaspoon)

1 teaspoon baking powder

Rind of 1 lemon, grated


Juice of 1 lemon

½ cup sugar


Mix all ingredients except the lemon juice and ½ cup sugar.  Start by beating the softened butter with the sugar.  Then add the eggs one at a time and beat until fluffy.  Add the milk.  Turn off the beaters and add flour, salt and baking powder.  Slowly beat in the dry ingredients.  Bake at 350 (180 C) for about 45-60 minutes or until light golden brown.  Remove from oven and prick top with a fork.  Mix together the lemon juice and ½ cup sugar and pour over the pricks.  It is delicious!

Monday, February 1, 2016

Freezer Peanut Butter Cookies


Best Peanut Butter Cookies

I bake a lot in Japan.  We like to take treats when we visit people- which is often.  I provide refreshments for English class and sometimes bring dessert to FHE.  These cookies have probably been the greatest hit- these and the Snickerdoodles.  Everyone loves them.  I think because they don’t get much peanut butter here.  It is available, but a small jar costs $5.00.  I got big ones at Costco in Yamagata.  What I love is that you can make the batch of dough- make up however many cookies you want now, then freeze the rest of the dough in logs to cut off and use whenever you want.  The dough freezes really well. 

Peanut Butter Freezer Cookies

1 cup butter (236 grams)

1 cup shortening (I can’t find shortening, so use all butter.  I’m guessing margarine would work as well)

2 cups sugar

2 cups brown sugar

2 cups peanut butter

2 teaspoons vanilla   

4 eggs

5 cups flour

4 teaspoons baking soda

Cream together butter, shortening, sugars and peanut butter.  Add vanilla and eggs.  Mix well.  Add the flour and baking soda.  Form dough into logs and wrap in plastic wrap.  I usually wrap it in aluminum foil as well.  Freeze. When you want to bake the cookies, thaw the dough, cut into slices ¼ to ½ inch thick. Put some sugar on a plate and press each cookie in the sugar on both sides.  Place on a cookie sheet and slightly flatten each cookie by pressing with a fork one way, then perpendicular again.  Bake at 375 for about 8 minutes.  At home, I like to make up about half now and freeze the rest for later.  It makes a big batch.

Wednesday, January 27, 2016

Japanese Green Salad


Japanese Green Salad

Green salads in Japan are a little different than in America.  You can buy lettuce, but most often cabbage is used.  There are many different kinds of cabbage.  Grated dikon (big Japanese radish) is nearly always part of a Japanese green salad. 
Mushrooms are also plentiful in all of the stores and there are many, many different kinds of mushrooms.  The cucumbers are petite and delicious.   Salads are usually served like this- arranged with each vegetable separate.  The most common dressing is Goma dressing- roasted sesame seed.  It is delicious, but they have others as well.  We often make a salad like this and add chicken, making it our meal.  Enjoy a Japanese green salad!

Monday, January 25, 2016

Beans and Ham Soup


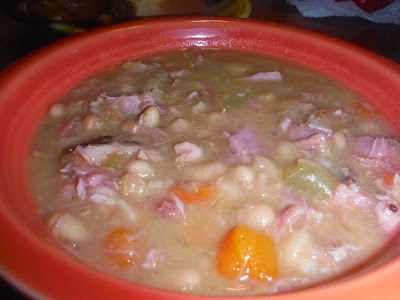
Beans and Ham

One of our favorite wintertime soups is beans and ham.  I had the ham bone from our Christmas ham frozen and wanted to make beans and ham with it.   In Japan, I had a hard time finding dry beans like I was used to.  I usually use white navy beans, but couldn’t find any white beans at all.  I could only find red beans and little black, round beans.  I bought the black beans.  They were absolutely delicious.  I have never tasted a better bean in my life.  I soaked them overnight, then cooked them with the ham bone and vegetables.  It’s hard to describe, but their texture was smooth and creamy and just delicious.  At home I usually use white beans or pinto beans.  But now I know that black works, too!  You can also make this with a ham steak, and I have many times.

2 cups beans (navy, pinto, black or a mixture)

1 meaty ham bone or a ham steak

Bay Leaf

1 onion, chopped

2 or 3 carrots, chopped

2 or 3 stalks celery with leaves, chopped

About 2 quarts water or chicken stock


Wash and sort the beans, throwing out any bad ones.  Put them in a bowl and soak them overnight.  In the morning, or several hours before you want to eat them the next day, drain them and add the 2 quarts water and the vegetables.  You can do this in a pot on the stove or in a crock pot.  Put the ham bone( if you’re using a ham steak, you can add it later.)  Cook until the beans are soft (the time it takes varies by what beans you use.)  Remove the bone and take off the meat and chop.  Discard the bone.  Add the meat back into the soup.  Serve hot. 

This is the same dish made with white beans in America:
I like to serve it with grilled cheese sandwiches or slices of homemade bread.  

Monday, January 18, 2016

Dill Pasta Salad

I love this salad!!! It's more of a summer salad but I was needing a little summer flavor so I whipped this up and I'm in heaven again (yes, in January). It tastes amazing with fresh garden tomatoes but it's still great with store-bought produce.

INGREDIENTS:

Dill & Garlic Vinaigrette:
-1/3 cup olive oil
-7 TBSP red wine vinegar
-2 tsp sugar
-1 large clove garlic, minced (about 2 tsp)
-1 1/2 TBSP fresh dill, minced. (I use LITEHOUSE freeze dried dill and it's awesome.)
-1 1/2 tsp dried oregano
-3/4 tsp garlic powder
-1/2 tsp salt

Pasta Salad:
-1 lb pasta (Rotini, bow-tie, choose your favorite shape)
-1 lb tomatoes (cherry, cut in half or 3 large, diced)
-1 lb cucumbers (approximately 2 large or 4 small), peeled and diced
-1/2 cup olives, drained, pitted & sliced (the original recipe called for Kalamata, but I like black or none at all)
-1/2 to 3/4 cup feta cheese, crumbled (I use 3/4 cup when I don't put in olives, it adds the salt it needs)
-2 avocados, diced (serve these on the side or else it browns in the salad leftovers)

DIRECTIONS:

For the vinaigrette:
1. Place ingredients in a jar, tighten the lid and shake until incorporated. Or sometimes I mix the dressing right in the bowl I'll put the ingredients in and whisk it, then add the ingredients and stir. Save 1/3 of the vinaigrette to add just before serving.

For the salad:
2. Cook pasta according to package directions. Drain and cool.
3. In a large bowl, combine all (except avocado) salad ingredients and toss with 2/3 of the vinaigrette until everything is evenly coated.
4. Cover salad and refrigerate for a few hours. The longer it "marinates" the more flavorful it is. When ready to serve add in the remaining vinaigrette and stir. I occasionally add a few dashes more of the red wine vinegar or leave it on the table for each person to add as desired. Serve with avocado on the side. Enjoy!

I got the original recipe from fivehearthome.com.

Sunday, January 17, 2016

Japanese Stir Fry


We are in Japan now!  My husband and I are serving a mission in Tsuruoka, Japan.  We are so happy to be here.  We are having so much fun experiencing the culture and cuisine of this land.  So my posts may be less frequent and the foods may reflect my new surroundings.  We are having amazing culinary experiences.  Every week, the members of the branch gather together on Tuesday evening and cook and eat.  It is a thrill to watch these ladies cook the foods of their land.  I take notes, but until I do it, I’m not sure if I’m getting it all. 

A dish I’ve already made several times is Japanese Stir Fry.  A rice cooker is an essential piece of kitchen equipment here.  In fact, it’s the main piece.  The rice cooker is very heavy duty and it cooks a lot of things besides rice (including our glazed Christmas ham slices)  You put the rice in and it cooks and then it keeps it warm and moist and ready to eat for literally days.  Since Japanese people often eat rice three meals a day, this is very convenient.  So, that’s where this recipe starts.  Cook some sticky, white rice (or you can do as we do and mix it with brown rice.)


Japanese Stir Fry

Cooked meat, cut up, any kind: ham, chicken, beef, pork  (opt.)  amount to taste  You can start by cooking the meat, which is what I usually do.

Vegetables of your choice:

Dikon (big Japanese radish- a staple in Japan.  It tastes like a radish when raw, but when cooked, is more like a potato), cut up

Cabbage, shredded

Green onion, sliced

Mushrooms (they have many more varieties here), sliced

Carrots, sliced

Broccoli, cut up

Cauliflower, cut up


Sauce:

Soy Sauce

Sugar, (a couple of Tablespoons)

Garlic granules or you can use fresh garlic in with the vegetables

2 eggs

Heat some oil in a large skillet or wok. Add the meat and cook (if not already cooked- like ham)  Stir fry the vegetables until tender.  Add the cooked meat and stir fry together for a minute, then add 2 eggs in the hot pan and scramble and stir in with veggies and meat.  Pour the sauce over and cook until hot and bubbly.  Serve over hot rice, sprinkled with sesame seeds.  Serve with sesame seed dressing (it’s the most popular salad dressing here- called Goma Dressing) and sprinkled with sesame seeds.